The active and passive check concept can be a little confusing to understand, especially if you’re new to Zabbix. Here is how to quickly make sense of it and if you’re familiar with SNMP traps, we can use that as a reference point as well.
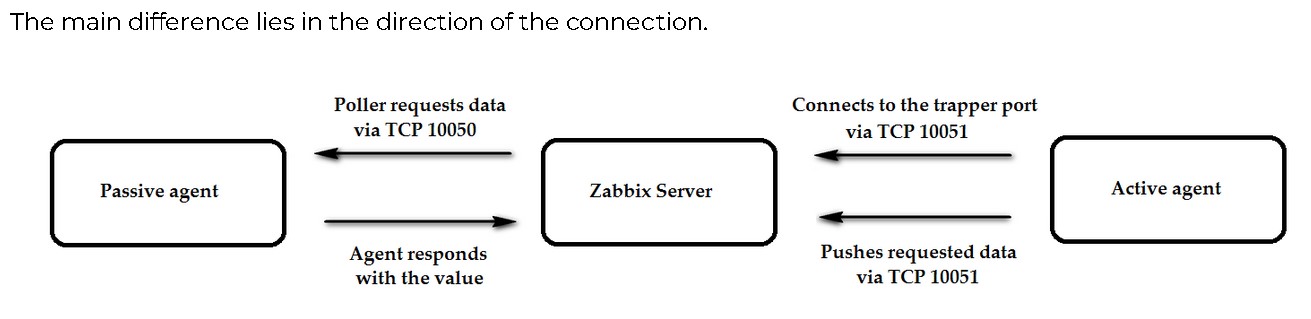
The distinction between active and passive monitoring in both SNMP and Zabbix revolves around where the data is generated from and how the communication flows between the monitoring system and the monitored devices. When the devices proactively send data, it aligns with active monitoring, and when the monitoring system actively queries the devices, it aligns with passive monitoring.
Think of SNMP Traps (if you’re already familiar that is)
SNMP Traps (Active) In SNMP traps, the SNMP agents (devices) generate and send unsolicited messages to the SNMP manager (monitoring system) when specific events occur. This is similar to Zabbix’s active monitoring, where the Zabbix agents (endpoints) actively send data to the Zabbix server (monitoring system) at regular intervals.
Regular SNMP (Passive): In regular SNMP, the SNMP manager (monitoring system) polls the SNMP agents (devices) for specific information by sending “GET” requests, and the agents respond with the requested data. This is more similar to Zabbix’s passive monitoring, where the Zabbix server (monitoring system) polls the Zabbix agents (endpoints) to retrieve data.
But Should I Use Active Or Passive Checks In Zabbix?
Of course there is no avoiding this question but like with most answers in IT, we land on the good ol, all to common answer ‘it depends’. FYI – Zabbix uses passive checks by default but here is a breakdown to help you make your decision. I personally believe the default passive checks work fine for most uses cases. However, the decision to use active or passive checks in Zabbix depends on your specific monitoring requirements and network environment. Each method has its advantages and considerations, so it’s essential to understand the differences to make an informed choice:
1. Passive Checks:
- Pros:
- Simplicity: Passive checks are easier to set up as they require the Zabbix server to have access to the Zabbix agents, and the agents only need to be running and reachable.
- Network-Friendly: If you have firewalls or network restrictions, passive checks are often more feasible, as the Zabbix server initiates the communication.
- Less Load on Agents: Passive checks put less load on the monitored hosts, as they only respond when queried by the server.
- Cons:
- Slightly Delayed Data: Passive checks rely on the Zabbix server to initiate data collection, so there might be a slight delay in data retrieval compared to active checks.
2. Active Checks:
- Pros:
- Real-Time Data: Active checks provide real-time data as the Zabbix agents proactively push data to the server at defined intervals.
- Lower Server Load: Active checks can reduce the Zabbix server’s load as agents are responsible for pushing data, and the server doesn’t need to poll multiple agents.
- Cons:
- Complexity: Configuring active checks requires additional setup on both the Zabbix server and agent sides.
- Network Configuration: Active checks may require network adjustments, and the Zabbix server needs to be able to reach the agents directly.
Considerations:
- If you have a simple network setup and no network restrictions, passive checks might be the easier choice to implement.
- If you need real-time data and have a more complex network or specific security considerations, active checks could be the preferred option.
Many Zabbix users opt for passive checks by default due to its simplicity and ease of configuration. However, some may switch to active checks for specific use cases that require real-time data or to reduce the server load.
Ultimately, the choice between active and passive checks should be based on your specific monitoring requirements, network architecture, and any potential security or performance concerns. It’s also worth considering testing both methods in a controlled environment to see which one fits your needs best before implementing them in production.
Official Zabbix documentation.
#understanding the difference between active and passive checks in Zabbix
#what is active and passive checks in Zabbix?
#should I use active or passive checks in Zabbix?
#zabbix active checks vs passive checks
#is zabbix active checks better then passive checks?