I first want to start by managing expectations here a bit before even diving into this. I would say you can achieve an entry level, half way decent gaming PC out of a project like this. You should be able to run most games on low to medium settings @ decent frame rates. I don’t want folks getting confused thinking they are going to get some high end gaming PC out of this because you will end up disappointed.
You can certainly upgrade these old Dell Optiplex computers beyond the level of what I have done here but then, IMO you are sort of crossing the threshold of what is even worth it financially. You get to a crossroads of worth – ‘well heck, if I’m going to spend that much upgrading this thing, I might as well spend a little extra and go for a brand new mid tier gaming pc’.
I would also like to note that this upgrade concept is not limited to Dell Optiplex 990’s and is applicable to most if not all older Dell Optiplex models. However, I will say to look out for the case form factor. I recommend always going for the larger full tower case models vs the slim chassis form factor on these guys. You want to be able to fit the larger more powerful graphics cards in the case right?
A project like this yields several benefits. To name a few off the top ->
- It’s simply fun to do
- You get to be resourceful and not waste an older computer
- Great learning experience for those new to computer hardware
- BIG savings – obtain a decent gaming PC without breaking the bank (I’ve seen Dell 990’s on ebay for as low as 99$)
Full list of parts used (with links) and estimated costs ->
- Dell Optiplex 990 Tower – $126
- 8GB of RAM – 31$
- Acrylic sheet (for side window) – $10
- x2 Bgears b-PWM 80mm Blue LEDs Gaming PC Cooling Fans – $24
- Seagate BarraCuda 2TB Internal Hard Drive – $50
- Kingston 240GB A400 SSD – $22
- ASUS GeForce GTX 1050 Ti 4GB Phoenix Fan Edition – $190
Total -> $453
Caveats to be aware of ->
- Upgraded blue LED fans are quite loud, so beware
- Blue LED fan connectors do not natively fit the fan headers on the motherboard. Fan headers must be modified (break down and remove plastic brackets) in order for the upgraded fans to connect successfully
- If you’re going to use a Dremel Tool to make your cuts, remember to use a metal cutoff wheel for metal and a plastic cutoff wheel for the acrylic. Seems like common sense but I found this easy to overlook and inexperienced users may just grab any cut off wheel. Of course using the right tools for the job is always optimal
- To attach these metal/plastic cutoff wheels to your Dremel, you will need a mandril bit which is included in this kit
- Motherboard fan headers are 5 pin, whilst the blue led fan connectors are only 4 pin. They will still fit (once you break down and remove the plastic bracket surrounding the pins) however, one pin is left exposed. Still works but I believe due to this exposed pin, you’re hit with a ‘cpu fan error, press F1 to continue’ every time you boot the computer. Doesn’t appear you can shut off this warning in the BIOS either unfortunately. You could possibly stick a jumper onto the exposed 5th pin and that may trick the error message into going away but I digress. The prompt is a bit annoying but not a deal breaker, simply hit F1 to continue an you’re good
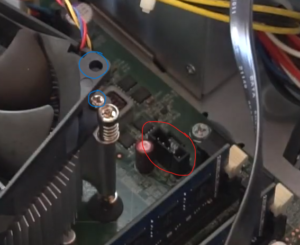
- Another sneaky challenge I ran into is removing the CPU fan. You will need to have a long skinny Phillips head screwdriver that can fit through the small cpu fan holes (below pic circled in blue) to reach and remove the Phillips screws
Ref. pic of black fan header bracket that needs to be removed (circled in red) and the small cpu fan holes you will have to get through (circled in blue) ->
Conclusion ->
Over all I am quite pleased with this build and the performance. For a budget gaming PC with an i5 and a 1050 Ti in it, I’m averaging about 55-60FPS on low settings and then 45-50 FPS on medium with temps stable at 55-60c under load while playing ‘Hold Fast: Nations At War’ (graphic intensive game). So that should give you a basic overview of how this thing will perform.
Lastly I want to make a suggestion not mentioned in the video and that is, I recommend cleaning and applying a fresh coat of thermal paste to your Optiplex cpu if you notice your temps are running abnormally high. That may help out.
Reference video below for the ‘hands on’ build and demonstration guide ->