Introducing: “DigitalPersons”
An AI-powered media brand specializing in scroll-stopping, viral short-form content — and the creative AI muscle 💪 behind our operation. Together, we combine technical expertise with creative direction to produce AI content worth staring at 👀, including hyper-realistic digital art, surreal video experiments, and expressive synthetic characters. All designed to capture attention and drive engagement.
When we say we know AI, we mean it — from business automation to viral AI-generated content, we can help!
Whether you’re setting up AI servers, hosting private chatbots, building custom image/video generators, experimenting with tools like Automatic1111 or ComfyUI, or wanting to learn how to create viral AI videos like this —we’re here to help. 💼🧠🎨
Below you’ll find a few examples of what’s possible in terms of viral AI generated content. We can teach you!
DeepSeek R1 is shaking up the AI world! It’s a powerful open-source AI model that rivals ChatGPT while being cheaper, faster, and even self-hostable.
Today I’ll be quickly breaking down why DeepSeek R1 is all the hype, how it compares to ChatGPT, and how you can install it (self-hosted) on Windows in minutes!
So whats all this deepseek fuss about and how does it compare to ChatGPT?
DeepSeek R1 vs. ChatGPT: A Head-to-Head Comparison
The AI landscape is evolving rapidly, and DeepSeek R1 has entered the scene as a serious competitor to ChatGPT. With its open-source nature, self-hosting capabilities, and performance claims, DeepSeek is drawing attention from AI enthusiasts and developers alike. But how does it really stack up against ChatGPT? Let’s break it down and let you decide which is the best fit for your needs.
1. PERFORMANCE: SPEED VS. DEPTH
DeepSeek R1 is designed for speed and efficiency. It’s optimized for quick responses, making it a strong choice for tasks that require rapid processing, such as data analysis and structured queries. Some early tests suggest that DeepSeek can outperform ChatGPT in raw speed and accuracy for certain technical tasks. However, ChatGPT has been praised for its nuanced, conversational responses, making it a better choice for more in-depth discussions and creative writing.
DeepSeek Strengths: Faster response times, excels in structured queries. ChatGPT Strengths: More natural conversational abilities, better for in-depth discussions.
2. SELF-HOSTING: CONTROL VS. CONVENIENCE
A major differentiator is that DeepSeek R1 can be self-hosted. This means users have complete control over their AI, data privacy, and customization. For businesses or developers concerned about data security, this is a huge plus. In contrast, ChatGPT is cloud-based, requiring reliance on OpenAI’s servers, which offers ease of use but less control.
DeepSeek Strengths: Full control, better privacy, adaptable to specific infrastructure needs. ChatGPT Strengths: No setup required, hassle-free cloud-based accessibility.
3. COST: FREE VS. SUBSCRIPTION-BASED
DeepSeek R1 is open-source and free to use, making it an attractive option for those looking to experiment without financial constraints. ChatGPT has a free tier but comes with usage limits, and for access to the most advanced versions, a paid subscription is required.
DeepSeek Strengths: Completely free and open-source. ChatGPT Strengths: Offers a polished experience with premium features via a paid plan.
4. CUSTOMIZATION & FLEXIBILITY
Since DeepSeek R1 is open-source, users can modify and tailor the model to their specific needs, whether for enterprise applications or personal projects. ChatGPT, on the other hand, is a closed system, meaning users can interact with it but cannot modify its core functionality.
DeepSeek Strengths: Highly customizable and flexible for unique applications. ChatGPT Strengths: Well-optimized out of the box, with consistent performance.
FINAL THOUGHTS: WHICH ONE IS RIGHT FOR YOU?
Both of these AI Chat-Bot juggernaughts are neck and neck with each model having its strengths depending on what you’re looking for.
If you prioritize speed, privacy, and customization, DeepSeek R1 is a solid option.
If you prefer a polished, conversational AI with minimal setup, ChatGPT remains a great choice.
As AI technology continues to evolve, the best choice will depend on your specific use case. Have you tried both? Let us know which one worked better for you!
Ok So How Do I Install deepseek-r1 On Windows
Step 1 – download and install Docker on your Windows machine
Step 2 – download and install Ollama on your Windows machine
Step 3 – open powershell and run this command to install deepseek-r1 8b:
ollama run deepseek-r1:8b
Step 4 – we need to connect OpenWebUI to Ollama so that we have a front end ui to interact with our chatbot. OpenWebUI, at this time, does not run on Windows directly (it’s for Linux) and so we need to containerize it with Docker. Super simple, all you have to do is run this command (note – ONLY for windows running nvidia GPU’s):
docker run -d -p 3000:8080 –gpus all –add-host=host.docker.internal:host-gateway -v open-webui:/app/backend/data –name open-webui –restart always ghcr.io/open-webui/open-webui:cuda
Step 5 – Open your web browser and navigate to: http://localhost:3000/auth
Step-by-step video guide ->
how to install deepseek-r1 on windows server
how to install deepseek-r1 on windows
step by step guide on how to install deepseek-r1 on windows
deepseek-r1 installation on windows tutorial
Let Zabbix Stay On Top Of Windows Updates Monitoring For You
Anyone looking for an efficient way to monitor their Windows Servers for updates and receive automatic alerts for any pending updates? Look no further!
In just a few simple steps, you can configure your Zabbix sever to monitor for Windows updates and alert you whenever any updates are detected.
Step-by-Step Guide to Monitoring Windows Updates with Zabbix
Step 1. Download and Install the Zabbix Agent
First, download the correct Zabbix agent .msi from the official Zabbix download page, and install it on your Windows server.
Recommended download parameters:
Zabbix agent version: Agent 2 version that matches your Zabbix server version
OS distro: Windows
OS version: Any
Hardware: amd64 (for 64-bit OS)
Zabbix version: Choose the version you’re running
Encryption: OpenSSL
Packaging: MSI
Step 2. Add PowerShell Scripts for Checking Windows Updates
Next, download and place your custom PowerShell scripts (used to check for Windows updates) in the following directory: C:\Program Files\Zabbix Agent 2\zabbix-agent-scripts
Important Note
If you are running into execution policy errors, you will need to set your systems execution policy to ‘unrestricted’ with this command:
Otherwise your Powershell scripts will fail to run from Zabbix server. Highly recommend testing the Powershell scripts on your machine directly before moving on to next steps.
Step 3. Modify the Zabbix Agent Configuration
Edit the zabbix_agent2.conf file, located in: C:\Program Files\Zabbix Agent 2\
IMPORTANT NOTE – If you are NOT running ‘Zabbix Agent 2‘, then your directory path will instead be ‘C:\Program Files\Zabbix Agent\’. Ensure your directory path is correct otherwise your Zabbix server will not be able to make contact with your Zabbix script(s).
Pro Tip – Use a text editor like Notepad++ to modify the file.
Increase the timeout: Find the following block and add the last line to increase the timeout to 30 seconds.
### Option: Timeout
# Specifies timeout for communications (in seconds).
#
# Mandatory: no
# Range: 1-30
# Default:
# Timeout=3 Timeout=30
(Optional) Allow system.run commands: Find the “# DenyKey=system.run[*]” code block and add this line to the bottom: AllowKey=system.run[*]
Add User Parameters: find the “# UserParameter=” code block and add these lines to the bottom:
Restart Zabbix service on the windows server
Windows flag key + R on your keyboard to bring up Run then; services.msc>find ‘zabbix agent 2’ service>right click, restart
Step 4. Increase Timeout on Zabbix Server (if not already done)
If you haven’t already increased the timeout on your Zabbix server, do so by editing the zabbix_server.conf file: sudo vim /etc/zabbix/zabbix_server.conf
Look for the Timeout block and update it accordingly. After making changes, restart the Zabbix server: sudo systemctl restart zabbix-server
5. Create a New Item For Your Host In Zabbix Frontend
(note – if you haven’t created your host in Zabbix frontend yet, do so and then circle back to this step)
Navigate to the Items section for your host in Zabbix, and create a new item with the following parameters:
Name: Count Uninstalled Windows Updates
Type: Zabbix agent
Key: CountUninstalledUpdates
Type Of Information: Numeric (unsigned)
Host Interface: (Enter your host’s IP)
Update Interval: 1d
Increase item timeout to 30 seconds
Leave the rest of the parameters as default, and click Add to save the item.
6. Create a Trigger In Zabbix Frontend
Now, create a trigger to alert you when updates are available. In the Triggers section for your host, click Create Trigger with the following details:
Name: Windows Updates Available
Severity: High
Expression: max(/<hostname>/CountUninstalledUpdates,#1)>0
Note: be sure to replace ‘<hostname>’ with the actual hostname of your windows server
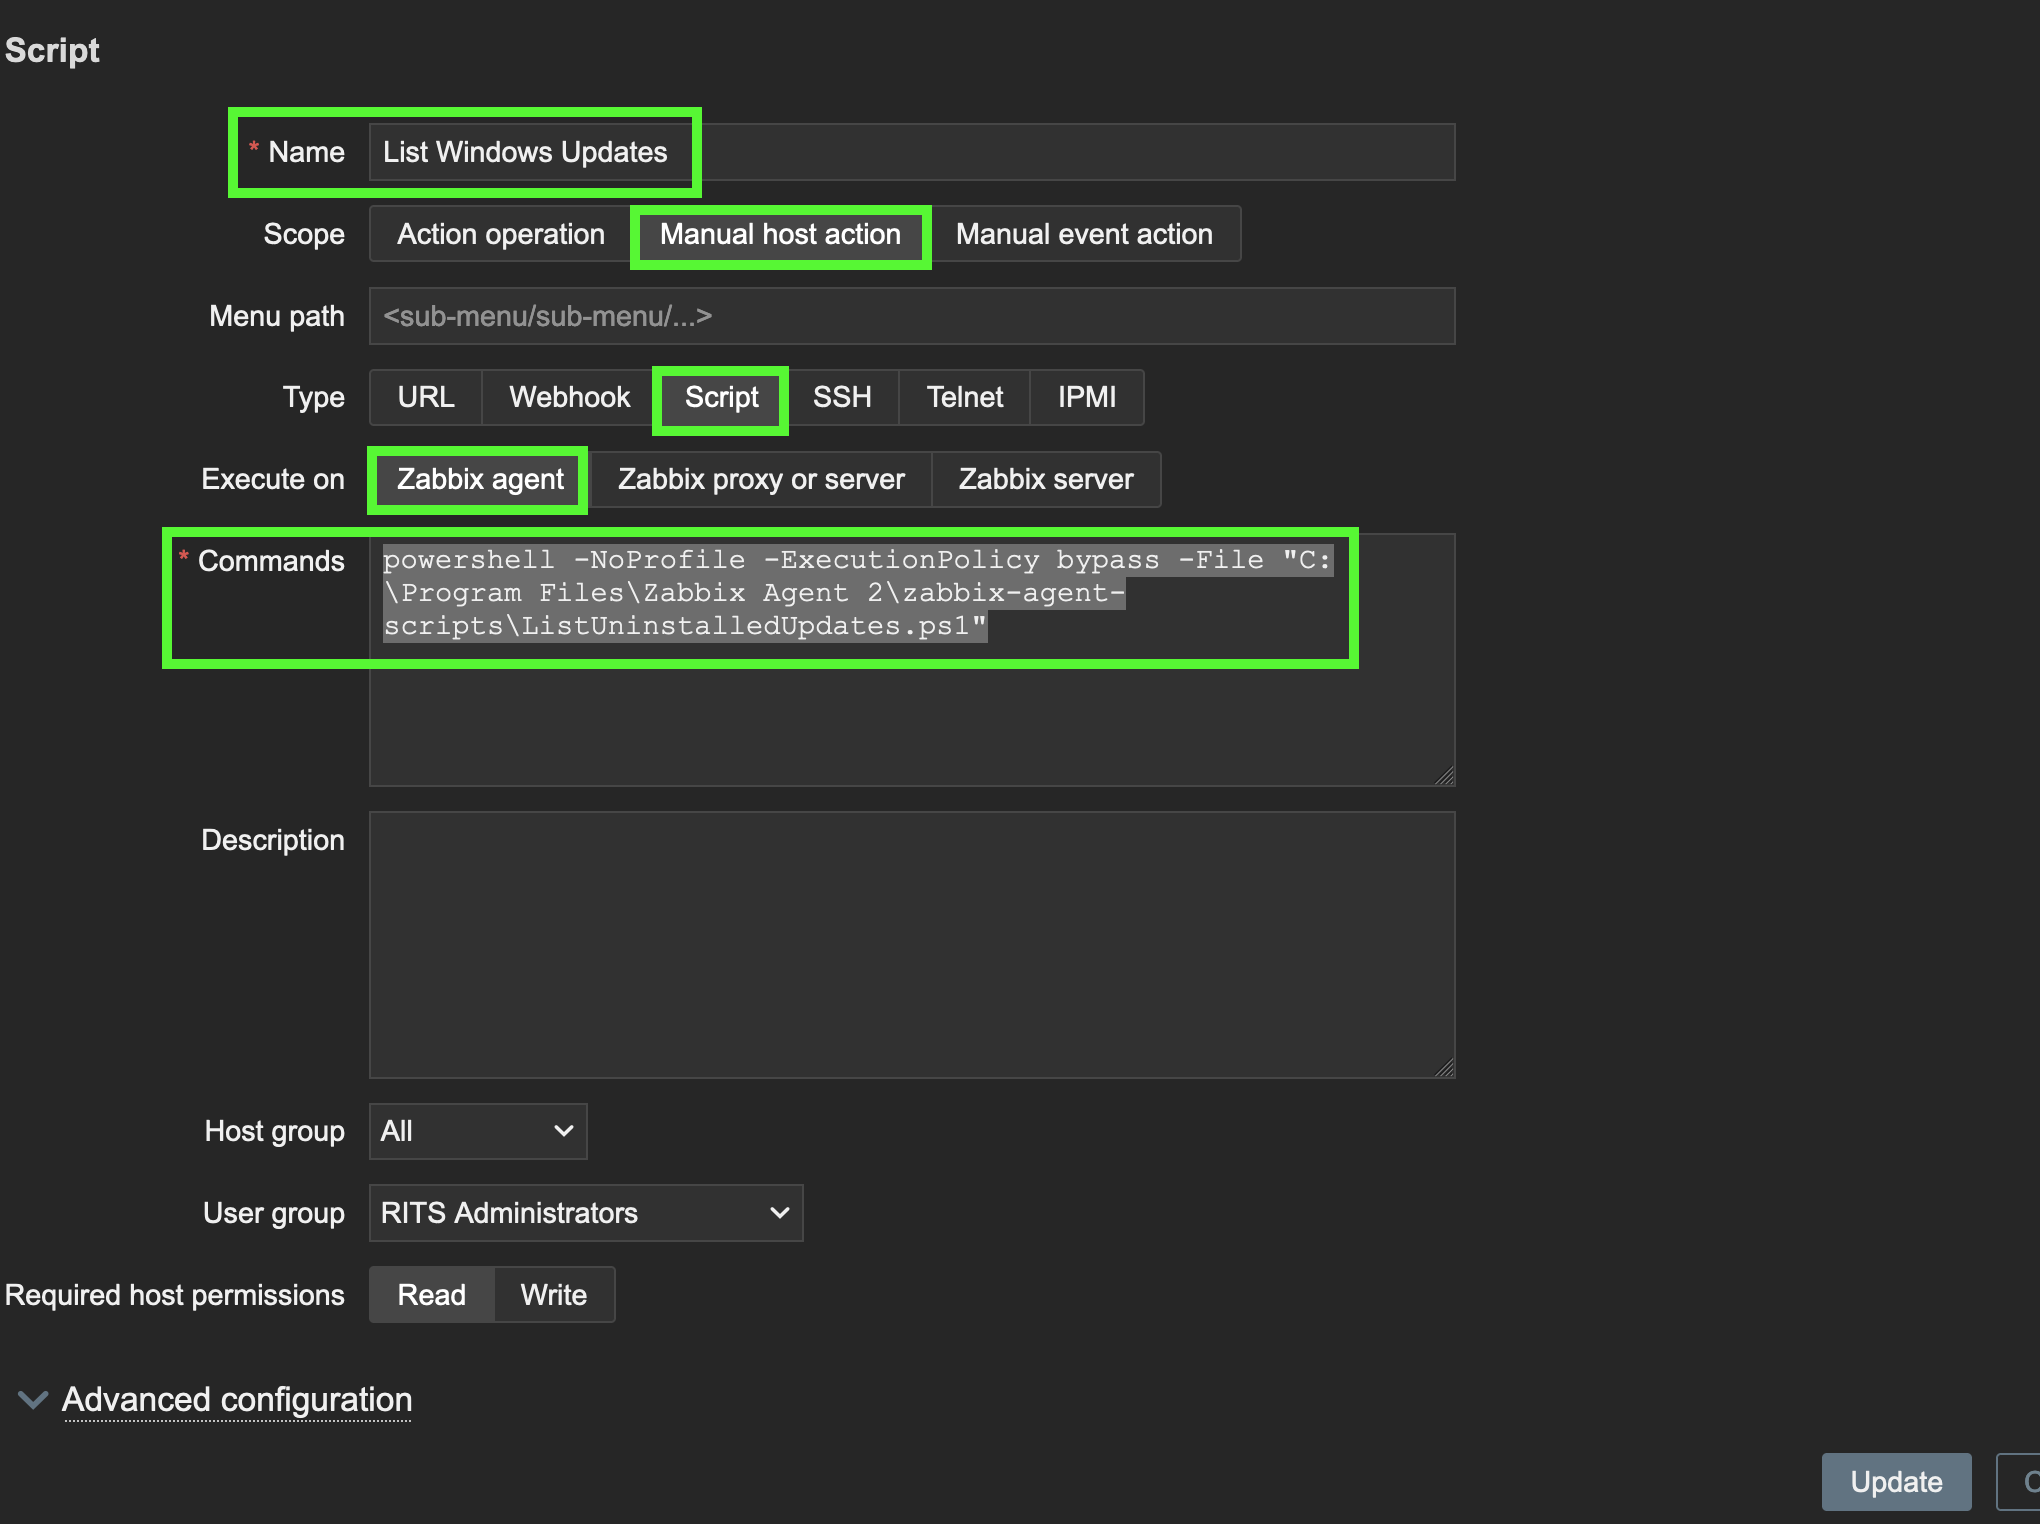
7. Add custom script to Zabbix frontend
This will give you the ability to query your Windows Server updates straight from Zabbix
– Navigate to the scripts section of your Zabbbix fronend. If you’re in Zabbix v7, it can be found on the left side column tool bar under alerts>scripts>create script
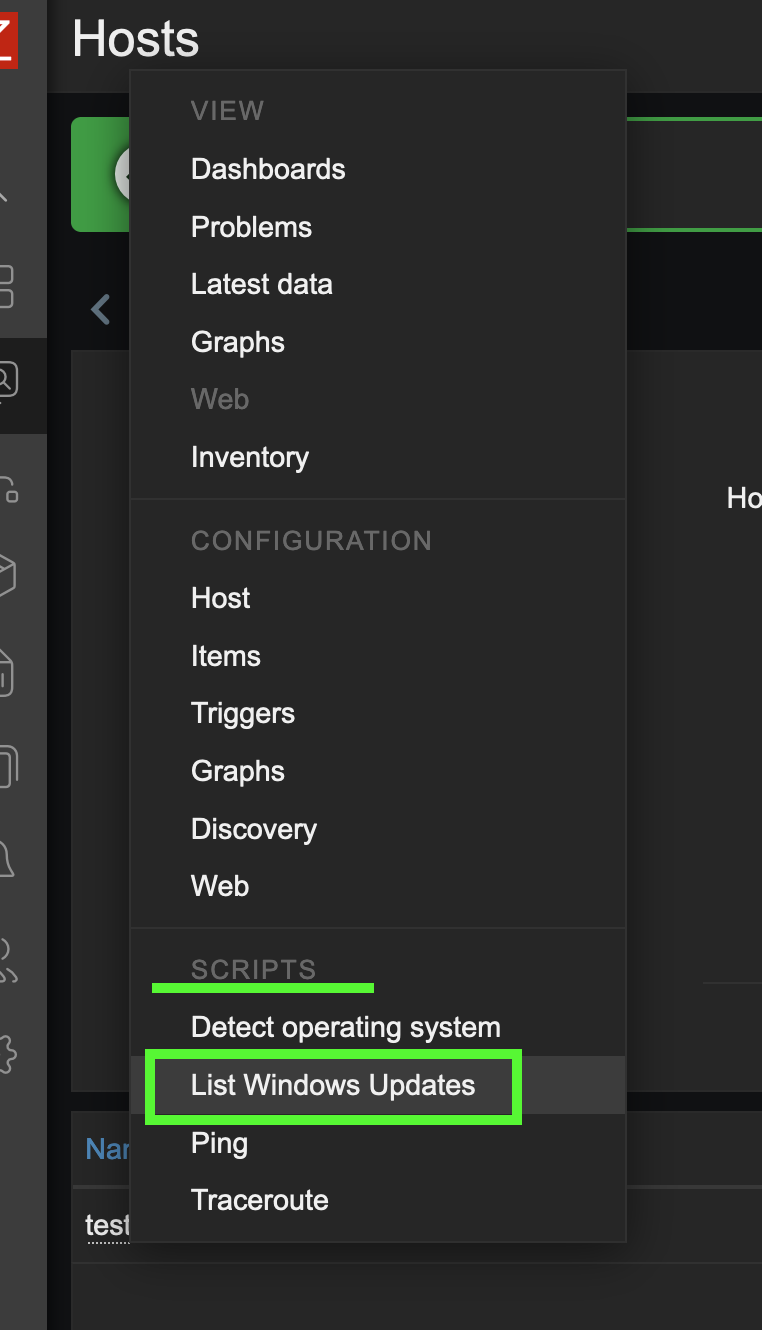
If configured correctly, you can now query your windows server for Microsoft updates straight from your Zabbix frontend by going to monitoring>hosts>left click on your windows server host and under scripts, select ‘List Windows Updates’
If you prefer a video guide, we’ll why didn’t you just say so ;-p